Introduction
This program is designed to alleviate the strain caused by extensive mouse usage, offering an efficient solution for users who experience wrist pain and finger discomfort. By allowing users to replace mouse clicks with customizable keyboard keys, the program reduces physical strain while enhancing productivity.
Key Features
Mouse-Free Operation
- Reduces wrist and finger strain
- Prevents repetitive stress injuries
- Enables comfortable long-term computer use
Easy Control
- Intuitive key mapping system
- Quick mode switching
- Seamless task transitions
Versatility
- Suitable for gaming
- Effective for work tasks
- Adaptable to various programs
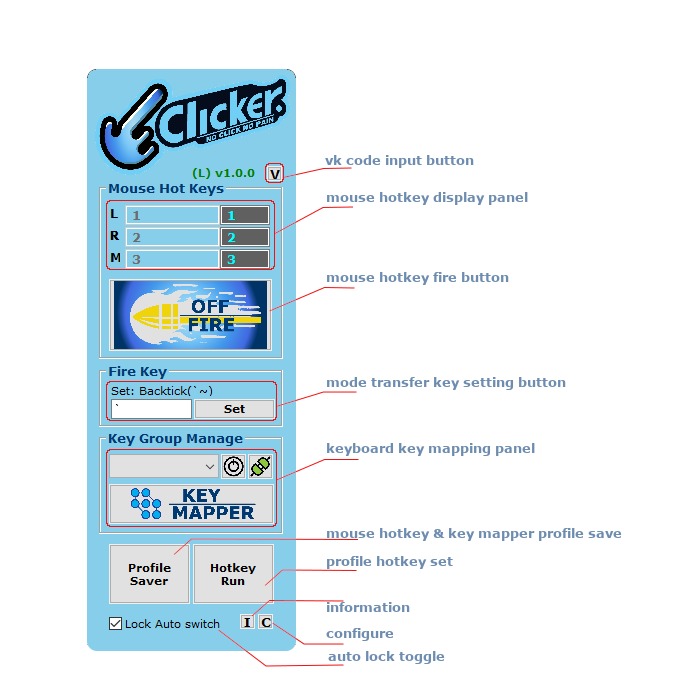
fig 1: main panel
VK code input

fig 2: VK code input panel
shortcut: [V]
Overview
This feature enables assignment of punctuation keys, symbol keys, and special function keys using VK codes. While the main panel only supports direct input of letters and numbers, the VK input panel (accessed via V button) provides broader key mapping capabilities.
Input Methods
Regular Keys
- Alphabet & Numbers
- Can be input directly into the panel
Special Function Keys
- Includes: RAlt, RShift, Apps, Ins, Del, PGUP, PGDN and other special keys
- Requires two-step input process:
- Press any regular key (e.g., number keys 1,2,3) to activate capture
- Press desired special key to capture its VK code
- Numpad keys behavior:
- With NumLock ON: Regular number input (treated as regular keys)
- With NumLock OFF: Special function input (treated as special keys - NumpadHome, NumpadEnd, etc.)
- Warning
- Avoid mapping modifier keys (LShift, LCtrl, LAlt) to L, R, M, or Key mapper as this will interfere with their normal functionality
Capture Process
- Important
- Exit capture mode using
[esc] or [tab]
- During capture, keyboard is locked by thread
- Other tasks cannot be performed while capturing
- Once you begin, complete the process to avoid interruptions
Setting
- Select desired keys for mapping
L,R,M
- Press
Set button to apply to main panel
- Test the set using the fire button
Default Key Restrictions
- Warning
- Important Restrictions:
- RShift, RCtrl, and AppsKey are reserved for default clicks:
- RShift: Left click
- RCtrl: Right click
- AppsKey: Wheel click
- These keys cannot be configured in LRM settings
- VK input for these keys will not function
- Default setup can be disabled in configure panel (👉 global config)
Main hotkey display

fig 3: Main hotkey display
L shortcut: [L]
R shortcut: [R]
M shortcut: [M]
The grid-shaped display panel represents settings and indications for (L) left, (R) right, and (M) wheel clicks on each row.
Values set through previous VK code input are displayed as shown in the picture. The left display cells show descriptions related to the VK codes on the right. When users enter values manually, they are indicated with a 'D'. LRM values cannot duplicate each other and must also not overlap with the Fire Key that will be discussed below. And below, it's a just big button for fire.
Version Control Status
Displayed in the upper-right area is the current software version, indicated using a colored (L) or (U) prefix.
(L)1.0.0 (in green): Indicates that the installed version is latest.
This means:
- The hash verification has passed via the license module.
- The version number has been written by the license module after successful validation.
- The local version has been compared against the remote version (via S3) and deemed current.
(U)1.0.0 (in red): Indicates that an updated version is available.
- Even if the hash verification passes, this red update mark appears if the version on the managing server (S3) is newer than the local version.
- In this case, the user is expected to manually download the update from the official homepage.
⚠️ Due to security considerations and AutoHotkey's limitations, automatic updates are not supported. Installation must be done manually to avoid introducing vulnerabilities.
Mode transfer key setting

fig 4: Mode transfer key setting
The clicker allows you to switch between fire mode and normal mode using these settings. By default, the developer designated the Backtick key as the most suitable key for mode switching. For retaining its original function, the Backtick key was reassigned to the Scroll Lock key, so pressing Scroll Lock will now produce a backtick. You can still type the tilde ~ by pressing Shift + Backtick, even in fire mode. If you'd like to change the key used for this reassignment, you can choose from three options in the configure panel. These three options were selected as sufficient for most users. As with the main hotkey, duplicate assignments with L,R,M are not permitted.
Key mapper control

fig 5: Mode transfer key setting
The purpose of the Key mapper (KMP)
The Key Mapper (KMP) is a tool that allows you to:
- Remap keyboard keys used for clicking
- Preserve original key functions by reassigning them to other keys
- Create customized key mapping profiles for different programs
- Note
- While initial setup requires time and effort, the resulting comfort and efficiency improvements make it worthwhile.
Key Mapping Display
The key mapping dropdown list window shows all currently configured key mapping profiles, allowing you to monitor and manage your custom configurations.
KMP Button
shortcut: [K]
User can open Key Mapper Panel.
Activation switch
shortcut: [A]
The switch for activation of KMP
Link switch
shortcut: [N]
- Enabled: Clicker and KMP operate together (recommended)
- Disabled: KMP operates independently from Clicker mode
- Warning
- If a shortcut conflicts with a definition in the KMP, the shortcut will be overridden and disabled.
Key Mapping Configuration
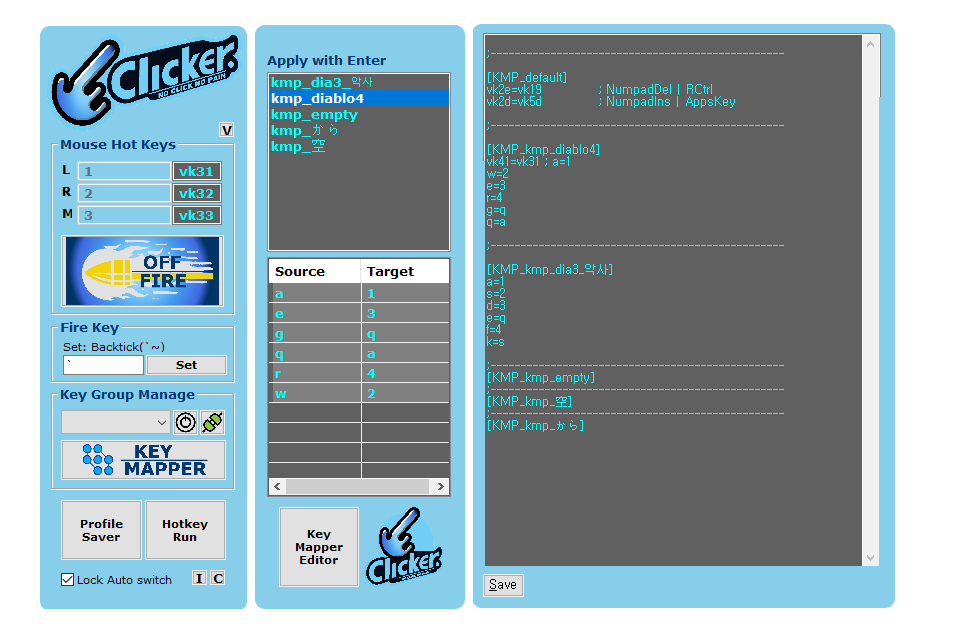
fig 6: KMP profile panel & Key Mapper Editor
KMP Profile Section
Section Format
- Important
- Section Rules:
- Must follow template:
[KMP_{section name}]
- Unicode letters allowed in section names, but recommended to use English letters
- Recommended to use
kmp_ prefix for profile management
- Comments start with semicolon
;
Example section structure:
[KMP_kmp_sample]
; This is a sample profile section
KMP_default
The KMP_default section is a reserved section with special significance :
- Global Settings
- Key mappings defined in this section are applied by default to all profiles
- This is a reserved section that keyword
default cannot be used in other section names
Basic Mapping Structure
[KMP_default]
vk2e=vk19 ; NumpadDel = RCtrl
vk2d=vk5d ; NumpadIns = AppsKey
To disable KMP_default settings, comment out the section like this:
[KMP_default]
; vk2e=vk19 ; NumpadDel = RCtrl
; vk2d=vk5d ; NumpadIns = AppsKey
- Purpose of Default Settings
- Since Clicker uses RShift(left click), RCtrl(right click), and Apps(wheel click)
- The original functions of these keys are reassigned to keypad's Del and Ins
- This allows users to access the original key functions during runtime
Key Mapping Rules
Basic Syntax
The basic format is: A=B (Use key A as function B)
Mapping Types
Usual Mapping
a=b
maps a to b
- Weird but effective Mappings
Key Format Rules
- Regular keys: Use direct alphabet/number characters
- Special keys: Use VK codes (e.g., 'vk**' for {,[,],/,\,;)
- Find correct VK codes using VK code input panel
- Warning
- Important Restrictions:
- No overlap allowed between:
- Key mappings
- Main mouse hotkeys (L, R, M)
- Mode switch key
- Invalid VK codes will be ignored.
- Special key is only possible through VK codes.
- Note
- For editing key mappings, you can use either:
Using VK Codes
You can check valid VK codes using the V button in the main panel.
Invalid VK codes will be ignored.
Valid mapping examples:
vk41=vk42 (source key vk41 mapped to target key vk42)a=vk42 (Direct alphabet 'a' mapped to target key vk42)vk41=a (source key vk41 mapped to target key a)
Invalid mapping:
vkxx=vk41 (Invalid source key)vk41=vkxx (Invalid target key)
- Note
- When adding or modifying VK code mappings, it's important to clearly indicate which keys are being mapped using comments.
Key Mapper Editor Button
Opens the KMP Editor using the editor specified in your preferences configuration.
Configuration Path: Configuration > Preferences > KeyMapper Editor Config
When clicked, this button opens the KMP profile configuration file in your configured text editor. See KeyMapper Editor Config for setup details.
- Note
- The button's behavior depends on your editor configuration in preferences. If no external editor is set, it will use the built-in basic editor.
Profile saver
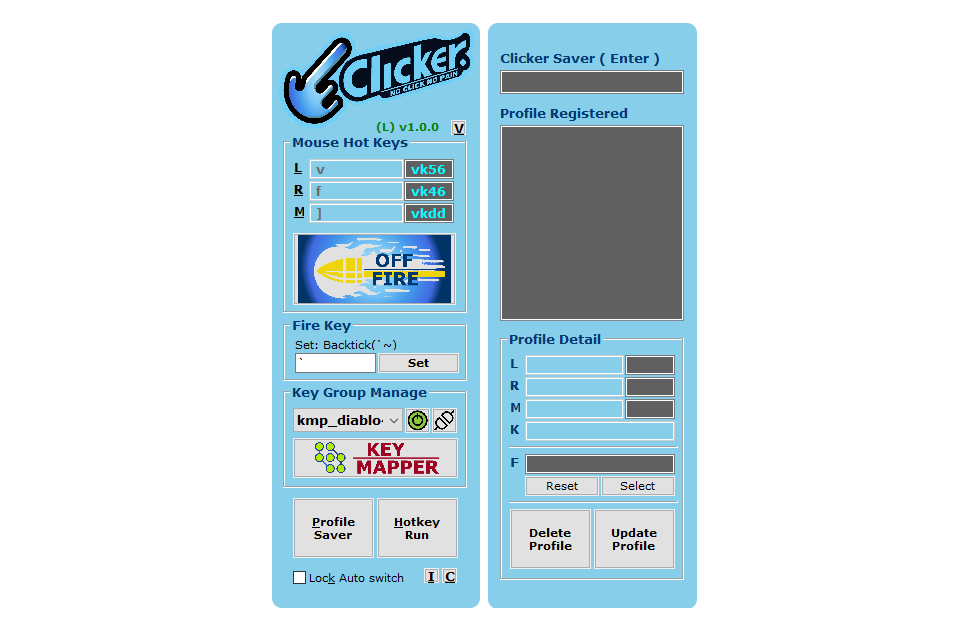
fig 7: Profile Saver
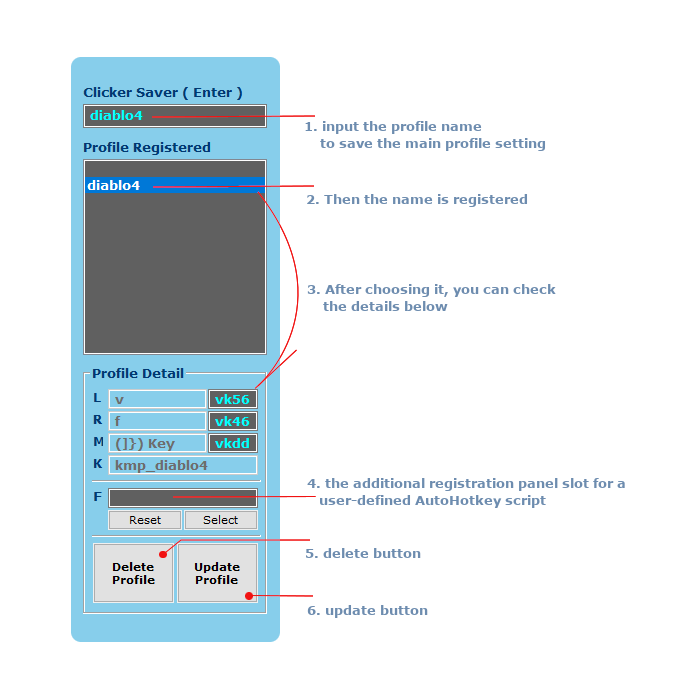
fig 7: save profile & delete profile
KMP Deactivation
- When you press the Profile Saver button, the Profile Saver window appears.
- Since KMP active mode may interfere with input, deactivate it by pressing the mode key (Fire key) twice:
- First press: Activates Clicker
- Second press: Deactivates KMP together (when linked)
How to Manage Profiles
- Save Profile
- Enter profile name in the Clicker Saver (Enter) section
- Press Enter key
- Example: Entering "diablo4" saves current main panel settings
- Profile Operations
- Delete: Select item and click [delete profile]
- Modify: 1. Select item 2. Make changes in profile detail section 3. Click [update profile] to apply
User Script Registration
The F section is a space for registering a custom AutoHotkey script that will run alongside the Clicker mode.
1. How to Register Scripts
- Use the
Select button to choose a script through the file explorer
- Use the
Reset button to remove the registered script
📌 Note: Only scripts located in the correct directory will be accepted.
The selected file must reside in:
[config base directory]/conf/scripts
If no custom config base directory has been specified, the default path is:
C:\Users\<username>\AppData\Roaming\Clicker3D\conf\scripts
2. Saving Changes
- After selecting or resetting a script, click the
Update Profile button to save your changes
3. Execution Behavior
- Registered scripts automatically run when the associated profile is activated
- Scripts automatically terminate when the profile is deactivated
- Note
Care should be taken to ensure registered scripts do not conflict with the Clicker's basic functions.
Also note that scripts located outside the designated conf/scripts directory will be ignored.
This restriction ensures compatibility with features such as Google Drive sync and profile switching.
Key Points to Remember:
- Clicker Saver (Enter): Import and register settings from main window
- Profile Management: Delete and edit registered entries
Profile hotkey run
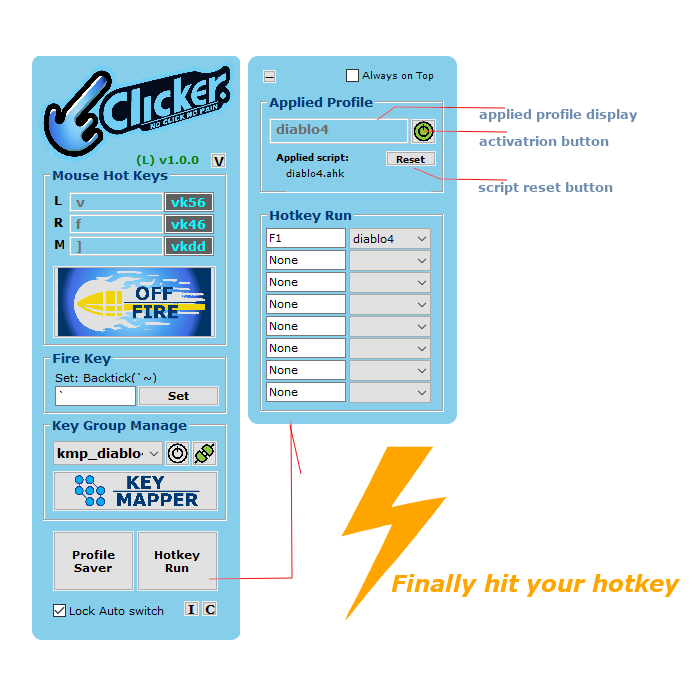
fig 7: Hotkey Run panel
Overview
The Hotkey Run panel can be accessed by clicking the Hotkey Run button, displaying:
- Profile display panel: Shows currently active profile
- Activation button: Toggle hotkey functionality
- Reset button: Resets the user script control temporarily (shortcut
R)
Hotkey Run (HKR) Controls
- Profile Assignment
- Select desired profile from dropdown menu
- Assign hotkey by clicking the field and pressing desired key: Recommended
F1 ~ F8
- Changes are saved and applied immediately upon selection
- Select the empty (blank) option from the dropdown menu to clear the current profile assignment
- Activation Control
- Global toggle:
Ctrl + F9 ( 👉 configuration)
- Can be toggled on/off to avoid conflicts with other programs using
F1 ~ F8
- Interface Options
- Fold: Collapses the HKR window to minimize screen space.
shortcut: F
- Always on Top: Keeps the window visible above other applications.
shortcut: T
- Note
- While HKR provides 8 default hotkey slots, you can expand this functionality by
👉 setting Config Base Directory
Lock Auto Switch
Purpose
Controls the automatic mode transitions of the clicker.
Key Features
- Default state: toggle via
LAlt + RAlt ( 👉 configuration)
- Prevents unwanted mode switches during typing/chatting
- Maintains consistent behavior during gaming or work
Usage Scenarios
- Enable for uninterrupted gaming or work sessions
- Disable for general browsing and chatting


